Are you interested in Project’s new agile features for Scrum and Kanban, but haven’t been able to get them to install? Do you want to link a Planner task to one of your Project schedules? To access these new features, you need to install Project in a specific way, which isn’t obvious. This article tells you what to do.
Note: Unless you are installing on a clean machine (that is, without Microsoft software installed), this process could take an entire work day.
Here’s what you do:
- You must have an Office 365 subscription instance with Office and Project (and optionally Visio).
- If any Microsoft Office 2016 editions are installed, you might want to uninstall them to make the new installation easier. The installation is covered in step 5.
When I performed this step, I uninstalled Office 2016, Project 2016 and Visio 2016 because I had the local msi files installed. I did not restart the machine and I kept InfoPath 2013 and SharePoint Designer 2013 64-bit on the machine, because I need them.
When I started the Office 365 Click to Run installation (to access this software you will need an Office 365 instance that contains the software licenses for Office, Project and, optionally Visio). The installer found the InfoPath and SharePoint Designer 2013 applications and asked if I wanted to install the 64-bit versions of Office software (because 32-bit and 64-bit versions don’t play well together) and the default is a 32-bit installation. I had 64 bit versions of InfoPath and SharePoint Designer.
- To ensure that the latest features for Project are installed, you must set the organization profile setting for your account to Monthly prior to the installation.
- Log into your Microsoft Office 365 admin account.
- Click “Admin center.”
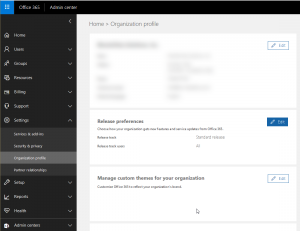
- In the left navigation bar, click Settings, and then click “Organization profile.”
- In the “Release preferences” section, click Edit, choose “Targeted release for everyone,” and then click Yes. Click Close.
This setting enables all users to access the latest features for all Office 365 applications. It takes about 30 minutes for this setting to be applied to your instance.
“Standard release” releases when the features are part of a public release. “Targeted release for selected user” sends release to specific users within your organization.
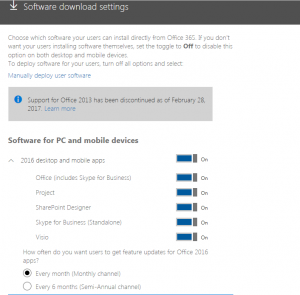
- In the Admin Center, click Home. On the home screen, in the “Office software” box, click the “Software download settings” link. Beneath the “Software for PC and mobile devices” heading, select the “Every month (Monthly channel)” setting, and then click Save. Click Close.
5. To install the software on a device, if necessary, log out of the admin account and log into the account to which the software is assigned. Then, do the following:

- On the main screen, click “Install Office apps,” and then choose “Office 2016.”
- To install the default software (English and 32-bit), click Install. In the pop-up, click Run.
- If there are 64-bit applications installed, the installer asks whether you want to change the install to 64-bit Office. You can click to switch to 64-bit during the install or go to the Advanced Version next to the language, shown in the screenshot below to make the modification prior to initiating the installer.
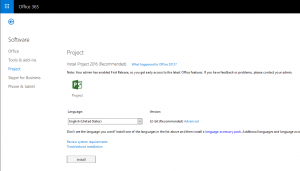
- To install Project, on the main screen, click “Install Office apps,” and then choose “Other install options.” On the left side of the screen, click Project. Above the Project icon, you will see a note that your admin has enabled First Release, so you get early access to the latest Office features. To install the default software (English and 32-bit), simply click Install. In the pop-up, click Run.
When the installations are finished, you will have access to the new features in Office and Project. (You can perform similar steps to install Visio.)
Note: Because my release preferences were initially set to “Standard release” instead of monthly, the latest features did not download. After switching the Office 365 organizational profile to monthly, I had to wait approximately 15 minutes for the applications to recognize that they needed updates. I initiated the updates for Office, Project, and Visio in that order. (To initiate the update, launch the application and click the File tab. On the left, click Account. On the Account screen, click Update Options, and then choose Update Now. If you don’t need updates, the dialog box below appears.)
To learn about Project’s new agile features, check out this Microsoft article. https://blogs.technet.microsoft.com/projectsupport/2017/10/30/project-goes-agile/.
If you have a questions or comments, please let us know at info@coldpresspublishing.com
Recent Comments